HacktoberFest 2022: Complete Step by Step Guide
Removing the barrier of entry for contributing to open source projects


This article will guide you through Hacktoberfest step by step and will cover everything you need to know to create a pull request and make your first contribution to open source during Hacktoberfest.
As a community manager for a developer community, I hear so many self-taught developers express how overwhelming and intimidating contributing to opensource seems and this article aims to remove that barrier to entry.
So in this article, we will be covering:
- 👉 The aim, the rules and registration in the Hacktoberfest event
- 👉 Github account creation
- 👉 What pull requests are
- 👉 How to create a pull request
- 👉 How to find suitable projects
- 👉 Some of my recommended projects
and so much more. However, if you would prefer the video format of this article you can get that here:
What is Hacktoberfest
If you're not sure what Hacktoberfest is or why it's a perfect event to participate in I created this video all about it but in summary, it is the biggest open source event for people of all skills and skill levels.
Whether you can code or write documentation, whether you test applications or create graphical assets regardless of your skill level then you have something to offer the open source community and should absolutely participate in this event.
What is the aim of Hacktoberfest
The aim behind Hacktoberfest at its core is to simply encourage healthy collaboration in open-source projects. But what exactly does that mean?
Well if we check out the official Hacktoberfest website and check out the participation page they do a great job of documenting the three core values of the event. Which are:
1️⃣ EVERYONE IS WELCOME
Regardless of skill set, skill level or previous opensource experience
2️⃣ QUANTITY IS FUN, QUALITY IS KEY.
This one is super important and we will touch more on this in the criteria for contributions section but essentially it's aimed at ensuring we create quality contributions that better the open-source community rather than overwhelm maintainers with spammy contributions.
3️⃣ SHORT-TERM ACTION, LONG-TERM IMPACT
Where creating quality contributions to open source projects no matter how small we have the potential to create a lasting impact on a considerable number of lives.
WHAT ARE THE CRITERIA FOR CONTRIBUTIONS?
Before we git started with contributing to opensource and participating in Hacktoberfest there are a couple of things we need to know and be aware of. The full list of criteria can be found on the participation page and I highly recommend you read them all since they are all equally as important, but here is the TL;DR
To be counted your pull request must be created during the month of October to a public repository that HAS opted into the Hacktoberfest event and is willing to accept Hacktoberfest contributors and this is important. Projects that have opted into Hacktoberfest will have the Hacktoberfest tag.
In addition, you must create a quality pull request to the project. The project maintainer has the ability to apply the spam or invalid label to your pull request. ⚠️ If you accumulate enough of these labels you can be excluded from the event entirely.
🔥 TOP TIP
October can be a busy and sometimes frustrating time for maintainers of open source projects. In previous years this event has caused a number of maintainers to become overwhelmed in dealing with the effects of poor quality and spammy contributions just to game the system and win the t-shirt.
IF you are just starting out with your open source adventure and are struggling to find something meaningful to contribute to a mainstream project, please respect the maintainers and their time by not giving in to the temptation to create a meaningless PR in the hopes it makes it. Instead, stick around til the end when I provide a bunch of projects everyone can legitimately contribute to.
GETTING STARTED
Okay, so now that we are all caught up on the aim, values and criteria for contributors we can get started with the contribution process by creating a GitHub Account and configuring Git on our computer.
We’ll need the GitHub account to register for Hacktoberfest, so if you already have a Github Account and have Git correctly installed and configured on your machine, feel free to skip to the next step, otherwise let's get set up…
👉 STEP 1 - Create Github Account
Creating a GitHub account is relatively straightforward. Open up your favourite browser and head on over to Github.com, locate and click the Sign Up button and continue through the process. If you need more help with creating the account then check out this timestamp in the video
👉 STEP 2 - Configure GIT
Now that we have a GitHub account we need to configure Git on our local machine. Most people often confuse Git and Github, thinking they are the same thing. We don’t need to dive too deep into the differences today but just note they are two different things with Git being the technology behind version control and GitHub being a cloud-based hosting solution for your version-controlled repositories.
Unlike Apple Macs, machines that run Windows do not come with Git pre-installed. So if you are a Windows user like me, you will first need to install Git before configuring it. Fortunately, this is super simple and self-explanatory, just visit Git for Windows download the package and run the installer using the default choices and once installed we can configure git.
We can double-check that git is installed by running the following command in the terminal:
git --version
Alright, now that we have confirmed git is installed on our machine, we need to provide Git with our Github details that it should use when relaying our actions to the Github platform and to do this we need to run two commands:
 git config --global user.name "Matt Smith"

 git config --global user.email "constcoding@gmail.com”
Once you have run both of these commands in your terminal, making sure to replace the values with your own name and email you will have configured Git 💪.
👉 STEP 2 - Hacktoberfest Registration
Next up is registering our intention to participate in the event and whilst technically this can be done at any time, I would recommend getting it done first so you don’t have to think about it. But if you're watching this in the last week of October, no need to panic register now and all your valid contributions should start appearing.
So to register for Hacktoberfest let's navigate to their website, click Start Hacking, Then select the Authorise with Github card and then follow through with the rest of the process. You can find a video walkthrough at this timestamp
👉 STEP 3 - Creating your first pull request!
Okaaay awesome, we are all set up, registered and ready to create our first pull request… Right?
Yeahhh I know it’s pretty intimidating at first, And I get it, with words like FORK, CLONE, BRANCH, COMMIT, PUSH & PULL REQUEST being thrown around it's easy to feel that way.
But rest assured every open-source contributor has felt like that and honestly it sounds and looks more challenging and intimidating than it really is and by the time you have earnt your t-shirt you’ll be wondering why you were so worried about it.
Ok, so lets take a look at each of those intimidating words we talked about just a moment ago and turn them into easy, actionable steps that you can put into practice and create your first pull request to the special project I have set up for you to both practice on and provide value to those that contribute after you.
FORK
Awesome so first up is forking and it just means creating a duplicate of the project under your own account so that you can work on it freely.
To do this we’ll navigate to the Const Coding Github Org and click on the Resources project, We then Click on the fork button up towards the top right and then click create fork. The video walkthrough can be found at this timestamp
And that's forking done.
CLONE
Cloning a project really means downloading the project to your local machine and just like forking it's a relatively easy step.
Just click Code and select the copy button next to the URL.
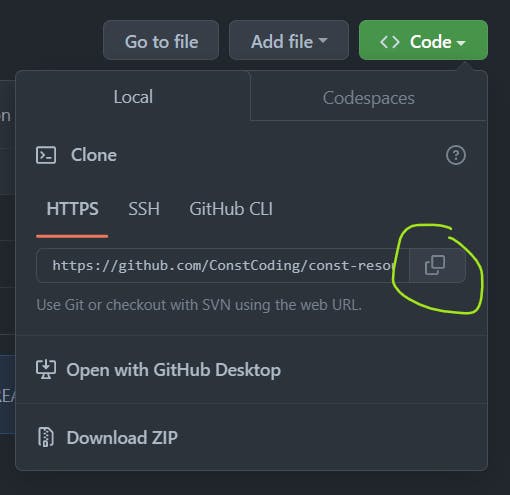
With this URL in your clipboard, open your terminal and type git clone and then paste the URL and then hit enter to download the project:
git clone https://github.com/ConstCoding/const-resources.git
And that is cloning done.
BRANCHING
Branches are used to define and isolate your changes. This one is difficult to understand at first, especially in demonstrations, so don’t worry if it doesn’t make that much sense right now. Just make sure to follow this step even though it looks like an additional pointless and redundant step, it will save you some headaches later.
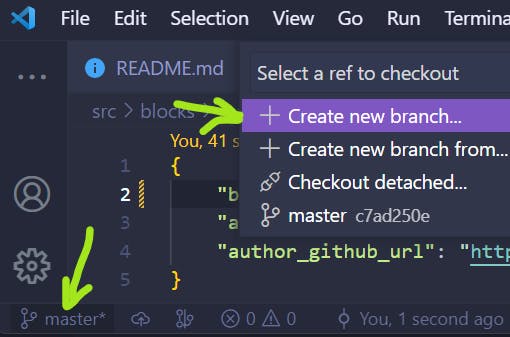
Fortunately branching in VSC is super easy.
- First, we click where it says
Master - Then up here we click
New Branch - Type our required branch name and hit enter
What we name the branch at this stage does not make much of a difference, but when you start progressing to bigger open-source projects they might have a preference for naming conventions which will be documented in the readme.
For this project, though it's not a big deal, let's just roll with something simple like combining my GitHub handle to the word addiction mattcsmith-addition creating something unique yet representative of the change we are about to make.
Hit enter and once we see our chosen branch name in the bottom left we know we have successfully created and moved into our new branch.
MAKE CHANGES
Awesome, we made it. We get to create the changes to the project, but I realise that I haven’t told you anything about the project other than it’s totally safe for your to contribute to and that with each new contributor it becomes more insightful and useful.
So I want you to think about the single most impactful resource you have come across in your mission to become a developer. It could be an article, a course, a youtube video or even a book and I want you to create a new line in the respective file and add your resource so that others can benefit from the resource too.
So the single most impactful resource I came across on my developer journey was a course by ZTM. So let's open up the courses.md file, .md means it's a markdown file, which if you have not come across before provides neat syntax to easily create a basic styled document which is outside the scope of this video.
Now in the courses.md file lets add a link to the course on a new line, we do that by wrapping our link text in square brackets followed by the URL in rounded brackets making sure there are no spaces between the brackets.
[Link Text](https://link.url)
Save the file and our changes are made.
COMMIT CHANGES
Committing Changes refers to the process of informing git about what changes you have made and the reason for the change that you plan to push up to the cloud in the next step.
Again this process is pretty simple, we just need to:
- Click the
Source Controlicon on the sidebar - Then hover over the changed file and click the plus icon
- Enter the reason for the change
- And then click the big commit button.
PUSH CHANGES
Pushing our changes is pretty much like it sounds. It’s where we tell our terminal that we are ready to push our committed changes up to the cloud, which in our case is Github.
To do this I like to open up the terminal in Visual Studio code, but you can use your terminal of choice and then type git push origin followed by the name of our branch which we can see in the bottom left corner. So in my case its
git push origin mattcsmith-addition
You will then need to authenticate it is you by providing your password.
CREATE PULL REQUEST
We are now on the final step, how awesome is that? We just need to create the pull request!
A Pull Request or a PR as its more commonly known is essentially a method for us to tell the maintainer of the project we forked from, that we have made some changes and are requesting that they review and Merge the changes into the original project for everyone to benefit from.
FIND PROJECTS TO CONTRIBUTE
You are already a quarter of the way to earning your Hacktoberfest swag, all you need to do now is create three more quality pull requests. You can do this either by providing three more resources to this project or you can look for other projects to join.
There are of course a couple of ways you can achieve this:
The first is by searching Github for Hacktoberfest. This is a good way to go, but in my experience requires some patience as you sift through the results looking for active projects that support the core values.
The second is by using sites like https://up-for-grabs.net if you feel ready to jump into a real-world project.
And the third option is to check out your favourite online community as they often create fun little projects for you to participate in. For example, ZTM has set up three practice projects that anyone is welcome to participate in.
I really hope you have found this useful and have some new found confidence to participate in projects. Be sure to check out the following articles if you haven't done so already: